

Raspberry Pi 3 Raspbian Jessie with WiFi, SSH, Headless Setup with No Keyboard or Ethernet
A quick guide to getting your Raspberry Pi 3 running in headless mode with SSH and WiFi without a Keyboard, HDMI or Ethernet
Edit [16th August, 2017 - I’m slow and lazy? :(]
Since I made this blog, Raspberry Pi has had several updates, and one of them makes it easier to set up a headless Pi without these many steps. Thanks Bernhard Reinel for pointing this out in the comments.
Motivation:
I just purchased the Raspberry Pi 3 Model B and was excited about it right until the moment it arrived. I quickly realized that I needed a MicroSD card to put software on, a power supply to keep it powered and Ethernet for Internet and a USB keyboard to run commands on it.
I had a power supply from one of my other devices, and I walked to a nearby store and bought a MicroSD card (I swear I had one lying around…). I didn’t really think it through but I hoped that there was some way I could get the Pi to work through SSH and eliminate the need for a keyboard and HDMI as well.
All online documentation that I could find required you to login to the Pi and run a few commands before you could make it headless. I wanted a way to do it without a keyboard whatsoever.
I found a older guide which used Ethernet but managed to do a headless install. That was a start, but not good enough as I didn’t want to use Ethernet either.
After playing around a while, I’ve come up with the set of steps you need to follow to get SSH access to your Raspberry Pi 3 Model B running Raspbian Jessie, current as of 13th December, 2016.
Things you’ll need:
- Raspberry Pi 3 Model B
- 8GB MicroSD card
- Card reader
- Power Supply for the Pi
- 4GB USB Stick (Optional)
- Internet
Steps
1. Downloading the tools
As mentioned, I’m using Raspbian Jessie. You need to download the image from this site first.
If you’re using Linux, you’re good to go. Skip to section 2. If you’re using Windows, continue below. If you’re using Mac, most of these instructions would work for you, but some of the tools, but you’ll have to make a best-guess about it.
If you’re using Windows, you need Win32DiskImager to write the raspbian image onto your MicroSD card. I tried using unetbootin cause I’m smart (citation needed), but it ended up creating an unusable disk. So just go by the official guidelines and use Win32DiskImager.
If you’re on a Mac, the official page might be your best resource.
Since we need our Pi to connect to the WiFi on boot, we need to configure some connection information into it before it starts up. Since Win32DiskImager creates an ext4 partition that doesn’t work on Windows, you’ll need a Linux machine, or VM to help you with making some changes to the files on your MicroSD card. I downloaded Tahrpup 6.0, a Puppy Linux distro from here for that job. Look for the tahr64-6.0.5.iso file. Puppy Linux provides a “live” ISO which doesn’t need installation to run, and is pretty clean - doesn’t leave junk on your disks.
Go ahead and download unetbootin as well, as you’ll need it to create a bootable disk of your PuppyLinux if you don’t want to run it as a VM. I have Hyper-V on my machine and it’s a pain to get it to work with USB sticks.
2. Installing the image
The official page is pretty detailed on how to install the image onto your SD card, so go ahead and do that.
3. Editing files on your MicroSD card
Once you’ve installed your image on the MicroSD card, it should have two partitions. The first partition, which is in FAT32, is the BOOT partition. The second partition, which is in ext4, is the one which has your Raspbian OS files. If you’re on a Linux machine, you should be able to see both partitions. If you’re on Windows or Mac, you might not be able to access the second ext4 partition. This is where your Linux VM/Live disk comes into play.
If you’re on a Windows machine, now’s the time to write your Linux image (Tahrpup) onto the 4GB USB Stick using unetbootin.
Boot into your machine from the USB stick now, which will run a “live” version of Puppy Linux, which doesn’t write anything to your disks and merely runs on your RAM for as long as you want. If you have trouble booting into the USB stick, it might be because you have Secure Boot enabled. You need to go into your BIOS settings and disable Secure Boot and allow legacy booting. You’d have to Google for how to do it for your brand of PC Manufacturer.
If you’re on a Mac, you might have to Google how to create a bootable USB stick from an ISO and follow the appropriate steps, and then boot into the Linux installation.
Once you are on Linux, you should see your MicroSD card (Let’s say it’s device sdc). Mount partitions sdc1 and sdc2. Let’s say you’ve mounted them to /mnt/sdc1 and /mnt/sdc2. sdc1 should be the BOOT partition formatted as FAT32. If you see a folder called etc in sdc1, it is NOT your BOOT partition. If you don’t, that’s your BOOT partition.
4. Enabling SSH on your Pi
There were various guides out there, and a lot of them focused on being able to access your machine with a keyboard and/or Ethernet. I didn’t have a keyboard, I didn’t want to use Ethernet, and I didn’t have SSH yet either. I wanted to connect to WiFi and then SSH into it, all without any extra wires.
SSH is disabled by default starting November. Enable it by creating an empty file called ssh in /mnt/sdc1/ folder of the BOOT disk. (i.e. /mnt/sdc1/ssh). SSH should be enabled now.
5. Modifying files to automatically connect to WiFi on boot
Once you’ve enabled SSH, the next thing to do is have your Raspberry Pi connect to the network so you can SSH into it. There are a couple of ways to connect to your WiFi if you have SSH/keyboard access to your Pi. However since we’re doing this without a keyboard or SSH, there’s only one way that I could get it to work. I’m assuming that you’ve followed all the steps I’ve detailed so far and haven’t modified any files apart from the ssh file above.
This post really helped me with this step, and I’ll detail out the necessary bits below so you can get going as well.
The dhcpcd service runs by default on Raspbian, and that’s what we’ll use to connect to WiFi. Things we need for this step are:
- Your WiFi SSID and PSK (The WiFi network name and password you use to connect to it).
- Your Gateway IP (Which is your Router’s IP).
We need to edit a couple of files - The /etc/wpa_supplicant/wpa_supplicant.conf file and the /etc/dhcpcd.conf file.
Open up the /etc/wpa_supplicant/wpa_supplicant.conf file first. Since this is on your mounted disk, it should actually be the /mnt/sdc2/etc/wpa_supplicant/wpa_supplicant.conf file. Don’t accidentally open up the file on your Linux instance and edit the wrong file. I’ve done that once.
This file should look like this:
1
2
ctrl_interface=DIR=/var/run/wpa_supplicant GROUP=netdev
update_config=1
Add the following lines below that:
1
2
3
4
network={
    ssid="SSID"
    psk="PASSWORD"
}
Replace SSID and PASSWORD with the ones for your network. This should work, but if it doesn’t, you might need to provide additional details in the network block. Google is your friend.
Next, open up the /etc/dhcpcd.conf file. Again, as this is a mounted disk, the file you want is actually /mnt/sdc2/etc/dhcpcd.conf. It should have a bunch of text in it already. Scroll all the way to the bottom and add the following:
1
2
3
4
5
6
7
8
9
interface eth0
static ip_address=10.1.10.100/24
static routers=10.1.10.1
static domain_name_servers=10.1.10.1

interface wlan0
static ip_address=10.1.10.101/24
static routers=10.1.10.1
static domain_name_servers=10.1.10.1
Here, the static ip_address values are whatever you want your IP address for the Pi to be. The first 3 numbers should be the same as your Gateway IP, the last number can generally be any number greater than 1 (Because that’s your Router), and less than 256. 100 and 101 should be a safe bet.
The static routers and static domain_name_servers should be your Gateway IP. To find your Gateway IP, you can run either the ifconfig method in Linux/Mac, or the ipconfig method in Windows. This will give you your a bunch of details about the network adapters on your machine. On Linux, find your eth0 (Ethernet) or wlan0 (WiFi) adapter block, and on Windows find your Ethernet adapter or Wireless LAN adapter block. Your Router/Gateway’s IP would be something like Default Gateway:
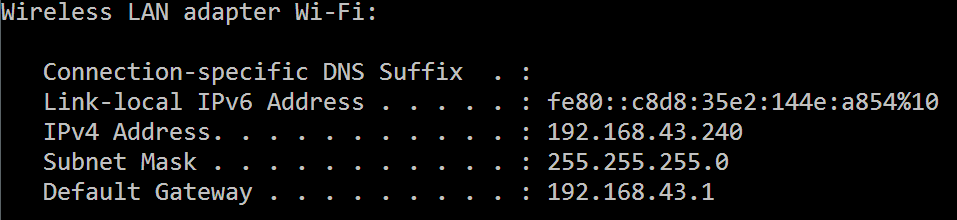
Usually it’s a number that looks like 10.0.0.1, 10.1.10.1 or 192.168.1.1. It pretty much always ends with 1.
Once you’ve made those changes to your /etc/dhcpcd.conf, you should be good to go!
6. Firing it up!
Unmount your MicroSD card from your machine, plug it into your Raspberry Pi, plug in your power supply and play the waiting game.
After a minute or two, your Raspberry Pi should be booted and waiting for you to SSH into it. You can check if your Raspberry Pi is connected to your network by either using your Router’s Connected Devices page, or an app called Fing on your Android device. If you don’t have either, just pray it worked :)
Now connect via SSH to your Pi. Just type ssh [email protected] on a Linux/Mac console, or use Putty on Windows. Once you SSH into your Pi, use raspberry as your default password and you should be in!
Hope this helps someone out there!